You might have done so much research to finalize a perfect domain name for your business. But, that’s not all! Right?
Buying a domain name is the real hustle that almost every business goes through. And, if you’re done with that hustle already, then you must be thinking I bought a domain name now What to do?
Once you’ve acquired your new domain, it’s time for some real work to start.
You can start by filling that website with valuable content, building your business a website and developing a marketing strategy to draw people to your brand.
Getting the right domain name is such a good thing. Because of this, you are just one step closer to having an awesome business exposure while you still need to do other things to get a website done.
It all starts with purchasing a domain name. Then your website will become online. Below are the steps you need to follow after buying a domain name.
[note]
I Have Bought a Hosting and Domain Name Now What!
If this is your case, then you can skip step 1 and 2. Move to Step 3 to Install WordPress
[/note]
Contents
Step 1: Get Web Hosting for your Domain name
There are many hostings which provide free hosting plans which I would never suggest to you. If you really wanna do something with your blog. Get a good amount of traffic and speed then I would recommend you buy Siteground hosting.
When it comes to web hosting, I always suggest Siteground as it is not that expensive and best for beginners.
Steps to Buy Siteground Hosting :
1. Click on the Special Link to Get Started.

I would recommend you to go with StartUp Plan if you’re just starting your blog. As it has enough features which every beginner needs.
If you already have a domain with a good amount of traffic you can go with GrowBig or GoGeek plan according to the monthly visits you have.
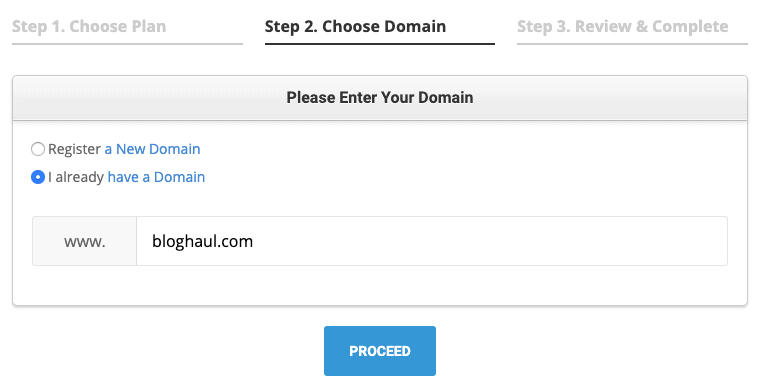
2. Enter your Domain Name
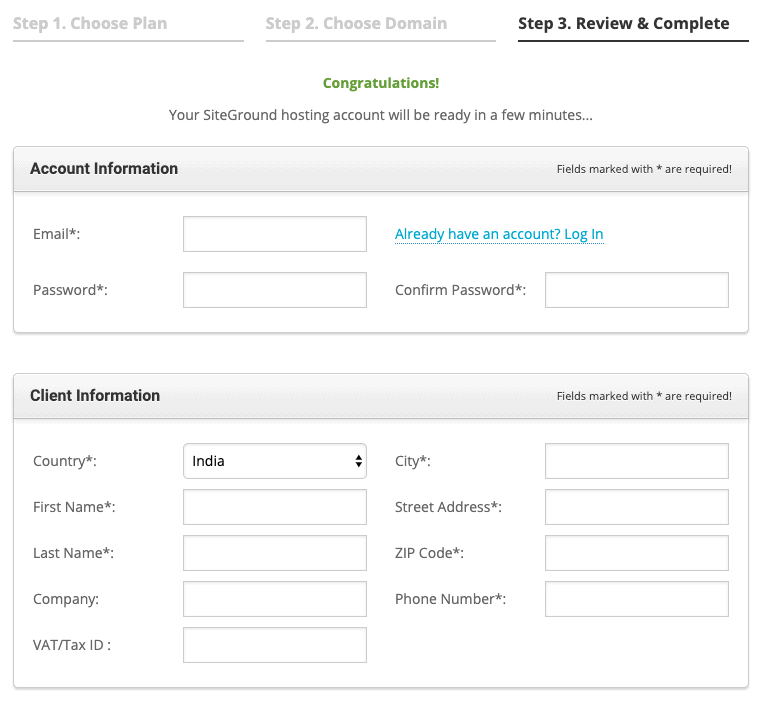
3. Fill out your Account Information
4. Enter your Card Details
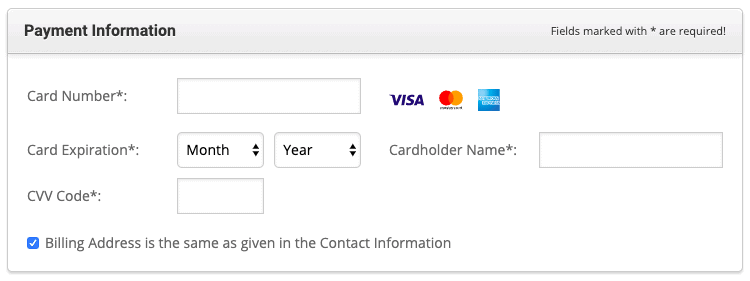
Enter your card details to proceed with the purchase of siteground hosting.
5. Confirm & Agree to the Conditions

Once you tick on the confirm the terms and policy. You’ll have to click on the “Pay Now” button to complete your hosting purchase.
Hurry! You’ve purchased your hosting.
Now you’re ready with your hosting and domain name. You can now proceed for further process to make your domain live.
Step 2: Point Domain To Web Hosting
Connect Your Domain With Hosting
Note : If the person has purchased hosting and domain name from the same company, then you can skip this part.
But on the flip side, if both are purchased from two different companies, then it is important to point your domain name to the hosting server to connect.
So that you can easily install WordPress on that website/blog.
Now, you can see how to connect your domain name to the hosting service providers.
Here are a few steps to connect your Godaddy domain to your Siteground hosting service provider:
Step 1: To get started with your work, first log in to your GoDaddy account.
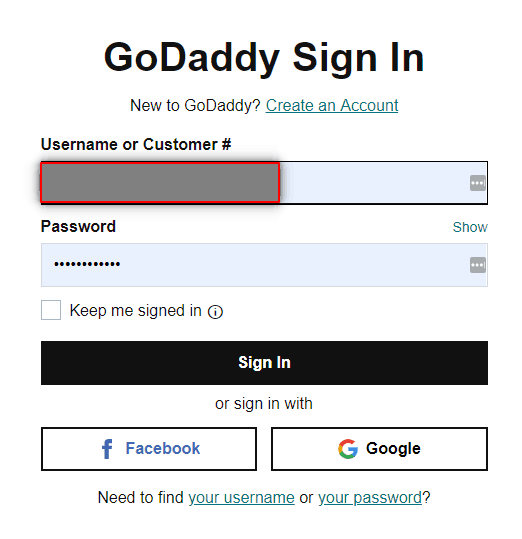
Step 2: Then you can select the domain which you want to point or host to Siteground.
Step 3: After choosing, click on DNS.

Step 4: Your DNS Management will open. Now scroll down to Change your Nameservers.
Step 5: Click on Change there and you will get the option to Add your Nameservers.
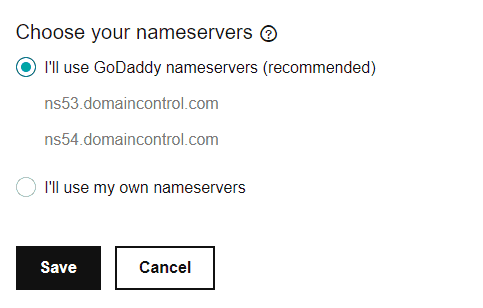
Step 6: Then fill out your Siteground Nameservers.
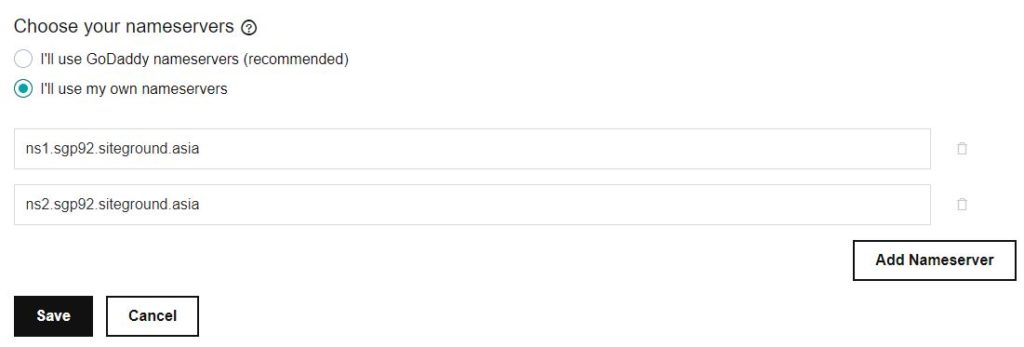
Step 7: Put your Siteground Nameservers that you get from your host and Click Save.
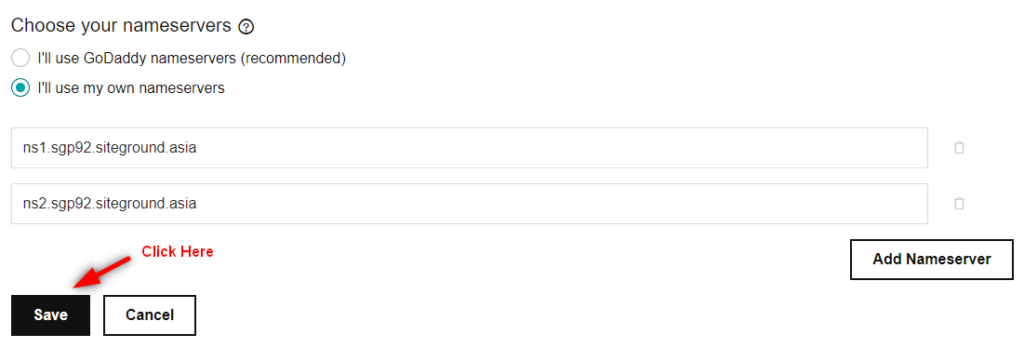
Once it is finished, it generally takes 15mins to 24hours to propagate.
Once the domain nameservers have propagated properly, you’ve successfully connected your domain with hosting. Please proceed with the next steps to get your site live.
I Have Bought a Hosting and Domain Name Now What
Step 3. Install WordPress
We have connected the domain name to the hosting. It’s time to start building your website.
Here, I would recommend using the WordPress Content Management System (CMS). As people can’t imagine, more than 35% of internet websites are using WordPress Platform!
It would be certain that WordPress is a good platform for your website. It allows you to edit, add and manage your site content very easily.
WordPress gives all access to the frontend and backend. For this, you won’t need to write codes and it can be done very easily.
It would also be helpful to save time With a one-click installation process, you will be up and running in just a few seconds!
Steps to Install WordPress on your Blog:
Step 1: Login to your Hosting Account & Click on Websites:
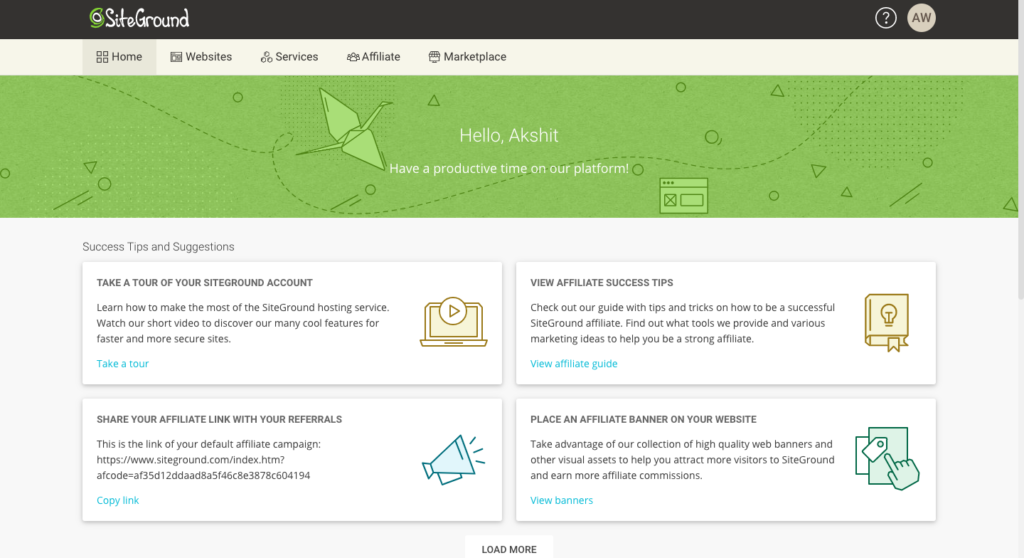
Step 2: You’ll see your Domain there. Under Domain, click on the “Site Tools” button.

Step 3: Click on WordPress from the left sidebar
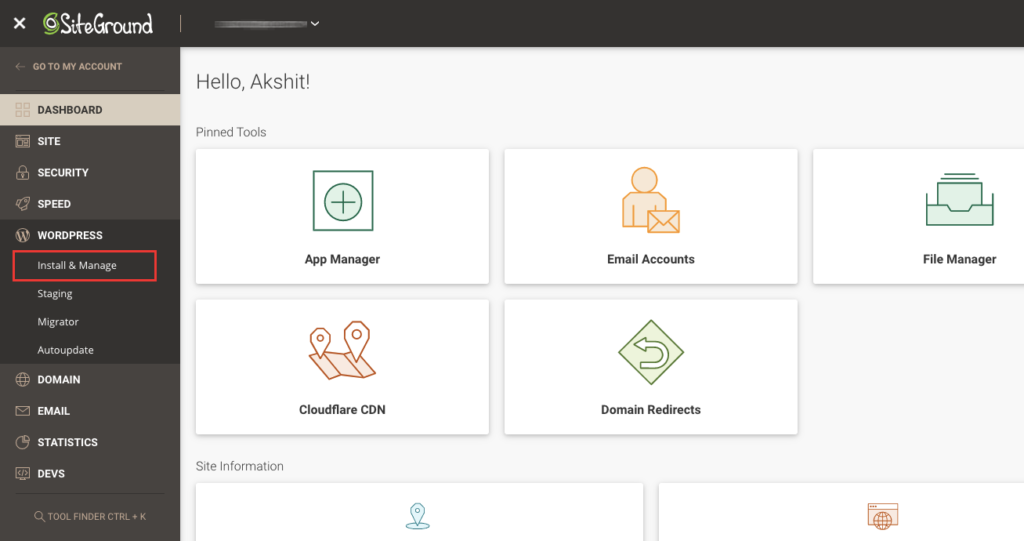
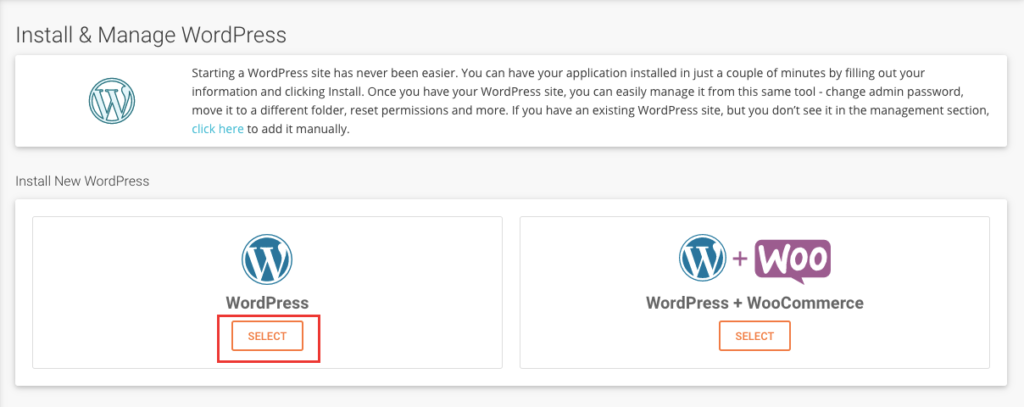
Step 4: Now click on the Select button under the WordPress logo.
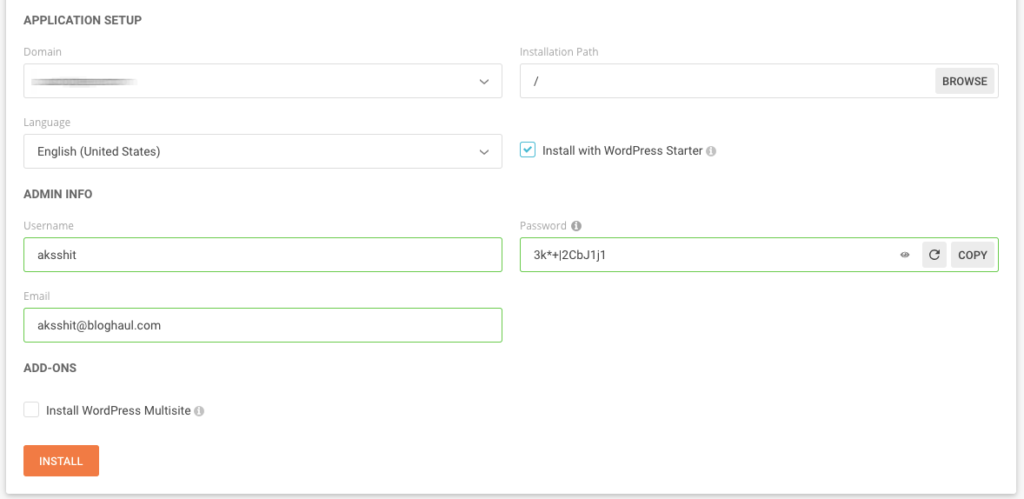
Step 5: Fill in the information as required and click Install.
Step 6: You’re ready to see your site live.
Step 4. Basic WordPress Configuration
After installing WordPress, there are some basic WordPress configurations you need to do. These configurations will help to optimize your site for productivity and performance.
While the default WordPress settings are most favorable, we still need to change a few of them.
Step 1: Trash all the dummy content.
Step 2: Trash all unwanted plugins.
Step 3: Configure WordPress Permalink Settings. (Settings > Permalinks)
Step 5. Choosing a WordPress Theme
The WordPress platform has been widely carried by a large section. There are thousands of plugins and themes (that are both free & paid) that can flip your site over and over again.
Now there are lots of available assets, You can build an extremely surprising WordPress site in no time.
Whether your site is a hobby blog, business or personal, there are many plugins and themes to help you here.
There are so many things to look for when you choose a WordPress theme for your website.
Not a good looking theme will work! Instead, you need to clean well-coded WordPress themes.
Who doesn’t look to build a strong money-making blog?
Here are the following three factors that are used on the WordPress theme:
- Fast Loading
- Mobile Responsiveness
- SEO Friendly
If you want to build a blog that will hopefully rank on search engines. Then you need a clean well-coded theme with better indexing capabilities.
I would suggest you go with the Astra WordPress theme. It’s a fast speed wordpress theme with all layout settings.
Download is Just a Click Away. Sign up to get Astra Free.
Purchasing a premium WordPress theme is one of the best options if you’re serious about your website. Premium Themes will give you endless options in terms of managing an expert site/blog.
There are a lot of themes in the paid version which works very well. But I’ve got something better with amazing speed optimized, mobile friendly, easy to use. So if you want all these features. Go grab Elementor now. It also works with the Astra free version.
Elementor comes with the easiest method to use. It’s a WordPress Page Builder which helps you to design your website as you want.
All you need to do is just buy elementor and start doing drag and drops on your website to build as you want. If you still have any issues with installing, buying or anything you can directly ask in our community.
Step 6. Installing Necessary Plugins
Also, there are important plugins that you need to configure and install. The following simple steps will help you with 3 important plugins to set up.
These plugins will help your site optimize for Security, SEO, Speed, and Performance. Here are the important guides:
Also, there are important plugins that you need to configure and install. The following guides will be available in 3 important plugins to set up.
These plugins will get your site optimized for SEO, Security, Speed, and Performance.
Here is the entire list of plugins that will make your life convenient and easier:
- Rank Math SEO – RankMath plugin is going to take care of the SEO of the website. You can easily add meta title, meta description & meta keywords through this which will help you in SEO.
- W3 Total Cache – This plugin will remove your website’s cache. Sometimes websites show the old content as the cache gets stored, so this plugin will clear the cache and show the live content.
- SocialSnap – This will help your users to engage with your content on social media by sharing it. This is basically a social media plugin which will add social icons to your blog.
- Akismet Anti-Spam – This helps to remove Spammy comments from your blog automatically.
- Wordfence Security – It helps in making your website secure from hackers & crackers.
Step 7. Create a Custom Email (@yourdomain)
If you want to give your strong brand name, then you must get a custom email address. It certainly helps to increase the brand name of your website.
If you have bought a domain name how do I get an Email? Then, it’s time to create your custom email address.
You can create a custom email address within your hosting account (there are no additional charges required).
You will be able to create an email address (xyz@yourdomain.com). Then create a forwarder to your primary email.
Steps to create a custom email address:
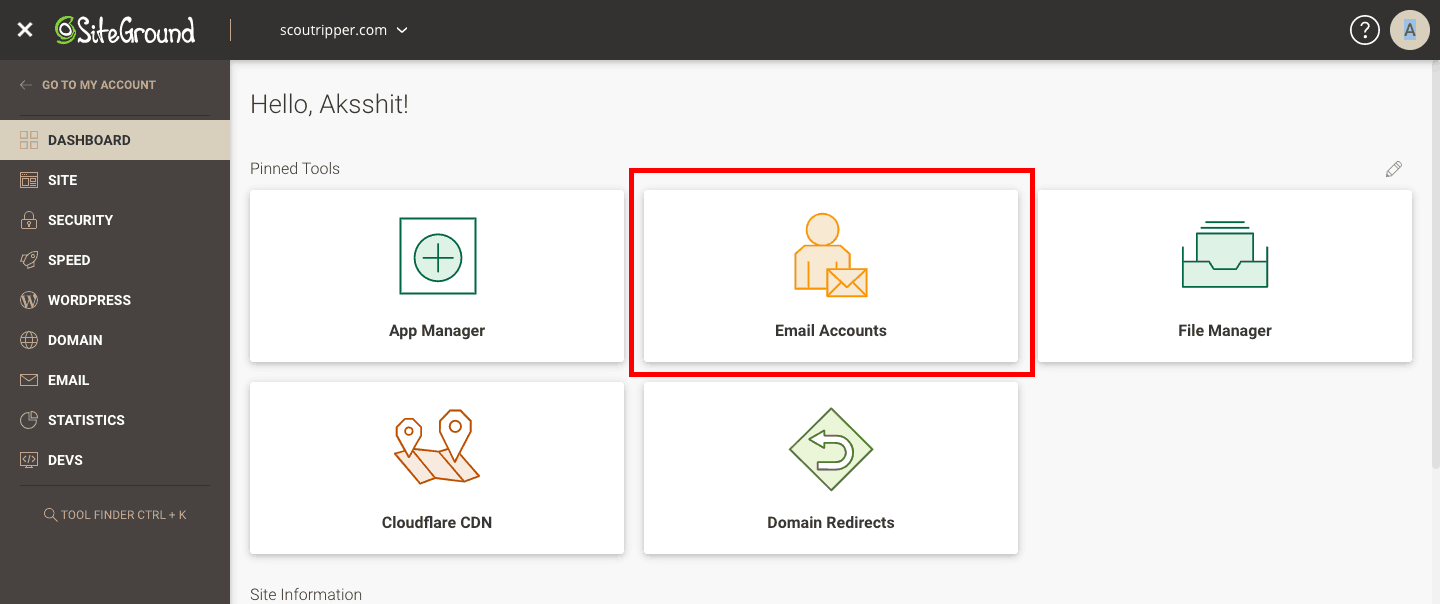
- First, you’ll have to go to the “Site tool” on your hosting dashboard and click on Email accounts.
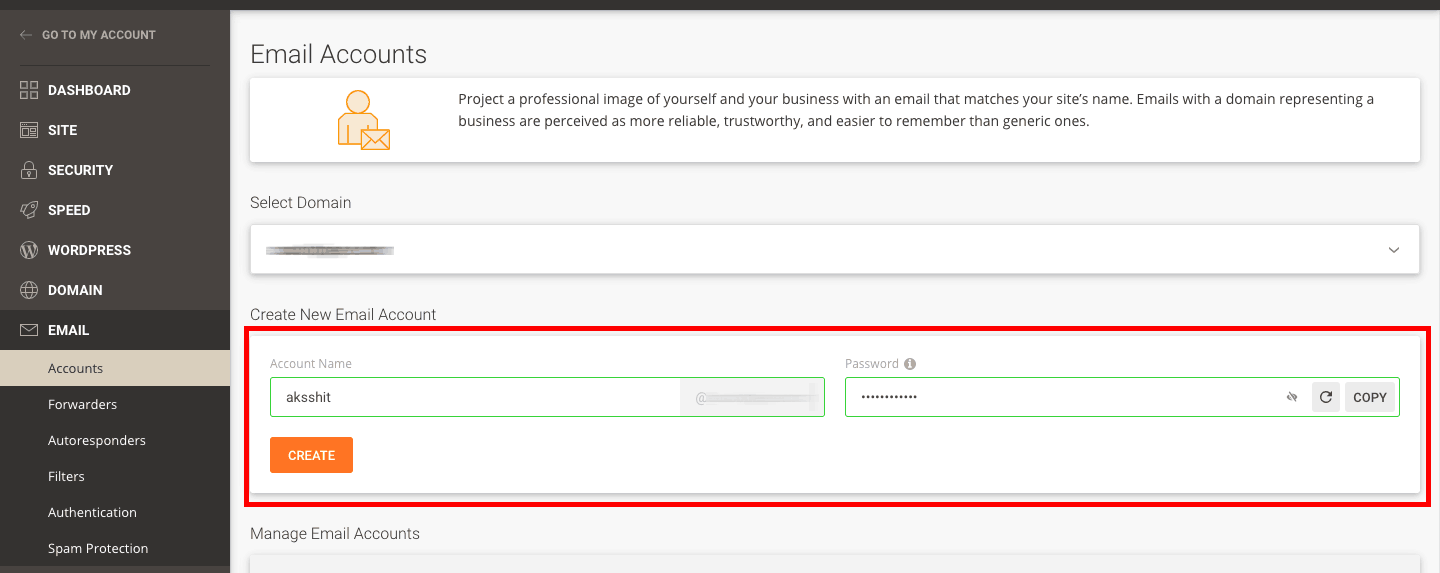
- Now put the email you want to create in your Account name and set the password you want for your Webmail.
- Your custom email address is ready. Now login to the webmail to check your mail.

- You’re all done.
You’ve successfully created your branded email address. You can start adding content to your site.
Step 8. Add Content
For your website, your content is one of the necessary and most important things. A website without content is nothing.
So you should start putting valuable content. The content will tell your visitors as well as search engines what the aim of your work is and what your site is all about.
Here are a few important pages you need to create and add right away:
- About Me.
- Services Page.
- Products Page.
- Testimonial Page (if you have any).
- Contact Us.
- Terms of Service.
- Privacy Policy
You just need to add relevant and important pages to your site that are useful.
Furthermore, It will be a great decision to have a blog on your business site.
This will help with getting traffic from search engines like Google, Bing, Duckduckgo, etc.
Blogging recently has become much more important and popular.
Blogging evolved into an industry of its own. Earlier, we used to see blogs that shared personal experiences and information.
But today, we got to see those blogs have become a great community business. Starting a blog has become a necessity and need for corporates and individuals nowadays.
In today’s world, bloggers are giving prioritized and important attention to building a mailing list.
By purchasing ebooks or enrolling in courses, you can get some sort of premium help from the blogger in great form.
Step 9. Setup Social Media Accounts
Social media has become an excellent way to communicate with fans, people, clients, and potential customers.
So when your site is completed or getting your site up and running, you should create social media accounts.
Your focus is on accessing maximum social media accounts. if you’re not expected to use all platforms then put your efforts into two or three platforms maximum.
By getting this way you can achieve maximum results.
Furthermore, the following guide will help you get noticed on the internet. You must sign-up for social media accounts to get access.
This will help you reserve the exact site name on your social media channels.
Step 10. Include Email Opt-in
It is another crucial and important item on the list. A mailing list will allow you to keep people engaged with your blog content.
Email Opt-in forms will help you build and grow a mailing list from day one. This will be helpful to increase the traffic to your website/blog.
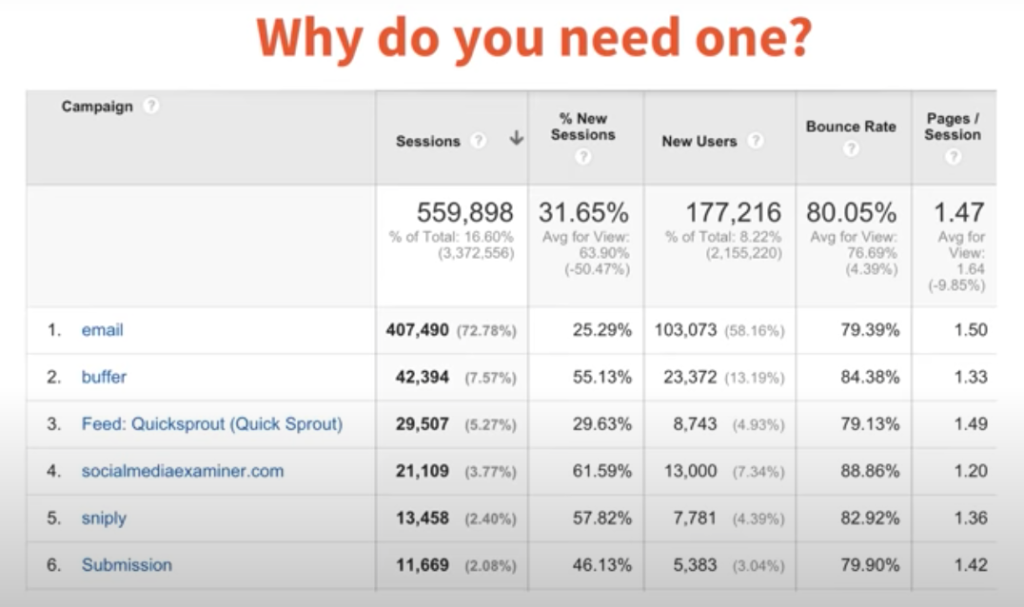
I would recommend you to use Convertkit for email marketing.
It’s always easy to get started. After doing these things regularly everything will be maintained and up to date.
In which a great idea is to build a mailing list. Including Email Opt-in will help you build a growing audience.
Conclusion
I hope this guide helped you with what to do if you’ve bought a domain name now what?
If you find our guide useful, then tell us in the comment section and share it on social media with your friends so they can also take benefits from this guide. Also, if you’ve got any issues related to our industry join our community.
[note]
FAQ of I Bought A Domain Name Now What
-
What to Do After Buying a Domain?
If you bought a domain name then you have to follow these steps.
1. Get a Web Hosting Package
2. Point Domain To Web Hosting
3. Install WordPress
4. Tweaks & Configurations
5. Choosing a WordPress Theme
6. Installing Necessary Plugins
7. Create a Custom Email (@yourdomain)
8. Add Content -
Can You Own a Domain Name Forever?
No, you can’t own a domain name forever. Instead, you can hold your domain name for a specific time period like many TLD’s are allowed to hold their domain for up to 10 years so you have to pay for 10 years and then renew when your expiring date comes.
-
Do You Need a Domain For a Website?
Yes, you need a domain for a website. Because domain is a set of unique IP and every website has their unique id so you need a domain for a website.
-
Where is the Best Place to Buy a Domain Name?
There are many top registrars available in the market but NameCheap, GoDaddy, Bigrock are very old and supreme domain registrars.
-
What are the Best Free Web Hosting Services?
There are multiple web hosting companies available for those providing free hosting, but they all are crap so.
If you’re serious about your business then always go with paid hosting plans.I recommend hosting these websites that will be best for you.
1. Siteground Hosting
2. WPX Hosting -
What Happens to My Domain When I Change My Web Host?
Nothing will happen to your domain. You just have to transfer your domain from Old Web Host to New Web Host to run it further. Still, if you don’t do anything about it. It will be available to you till the expiry date as a parked domain.
[/note]

You have explained things very nicely. Keep up the good work
Thanks Sufyan, It’s great that you got something.
Each and everything is well explained and I think many newbie bloggers confuse when they buy their first domain. But you solved their problem by giving such an informative article. keep doing the good work.
From this post, I gained idea how to buy a domain
Good guide for those who are looking forward to buy a domain and confuse what to do after purchased a domain.